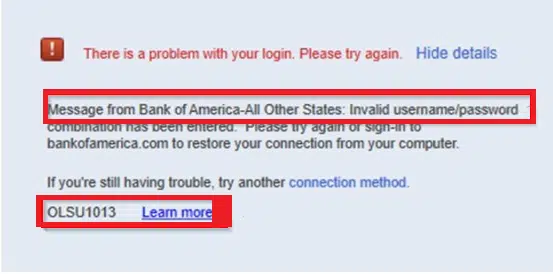
Attempts of accessing the bank account through QuickBooks can trigger QuickBooks Error OLSU 1013. This issue in most cases is a result of incorrect login credentials, back-end server maintenance, corruption of the Company files, etc. All such aspects shall be covered in this article alongside the different troubleshooting methods to “fix OLSU 1013 error in QuickBooks desktop”.
Factors that lead to QuickBooks Error OLSU 1013
Contributors of this error include:
- Wrong login details
- Bank server may be facing maintenance
- QuickBooks is unable to connect to the server due to network issues
- Sluggish internet
Strategies to rectify QuickBooks OLSU Error 1013
Checkout the following methods in order to resolve the QuickBooks error message 1013:
Strategy 1: Turn on TLS 1.2
- Open Internet Explorer and then opt for the “Gear icon”.
- Opt for the “Advanced tab” in the “Internet Options”.
- In the “Security” tab, choose the option to “Use TLS 1.2”.

- Now, click on the option to “Use TLS 1.0”.
- Then, go for the “Apply” tab and click on “Ok”.
- After that, try establishing the Bank connection with the server.
Strategy 2: Create a fresh Company File
- “Run QB (as an admin)” and once opened, click on “File”.
- Go for the “New Company” tab.
- Also, go for the creation of the account for the bank feeds option in this new company file.
- After that, “download Bank Feed Transactions” and check if Error OLSU 1013 is resolved.
Strategy 3: Go for the creation and merging of Accounts
- The user should right-click the account that is triggering OLSU error 1013. Then, tap on the “Edit Account” option.
- The following step is to choose the name of the account and then hit on “Copy”.
- Place an asterisk (*) after the name of your account.
- After that, go for the “Bank Feed Settings”.
- Now, hit on the option to “Deactivate All Online Services”.
- Now, click on the “Save Close” tab.
- Now, proceed to “Chart of Accounts” and paste the account name here upon removing the (*) symbol.
- Now, go for the reopening of this document.
- Subsequently, head for the “Chart of Accounts” and then proceed with “Edit Account” option.
- Here, hit on “account”.
- Once the (*) asterisk has been removed, select “Save Close”.
- Now, go for the creation of bank feeds.
Strategy 4: Deactivation of Accounts with Online Services
- First step is to go to “Chart of Accounts” tab.
- Afterward, pick “Include inactive”.
- For an inactive/dormant account, head for the option to deactivate bank feeds.
- Subsequent to that, establish bank feeds corresponding to every account.